The legs find their place of support
The straight right leg (knee extended) is turned around it's axis. We explore this movement in various positions: standing upright, in kneeling with one foot standing, in lying supine. Differentiations are made for the hip joints: turning the leg with or without the torso. Differentiation are also made between turning the lower leg with or without the upper leg.
After this lesson you might feel that your standing leg is in a much better place than before the lesson. Your leg might also feel lighter, better aligned and better posed in every detail. We „talk to” the nervous system through movement. By providing options to the nervous system it can calibrate and choose the most suitable organisation for posture and action. This is a radically dissimilar approach to stretching and strengthening. Explore this lesson with your standing leg first, then repeat the lesson with your other leg on another day.
standingstandingkneelingsupine turning_one_leg_1
Stand upright, with legs straight down from your hip joints.
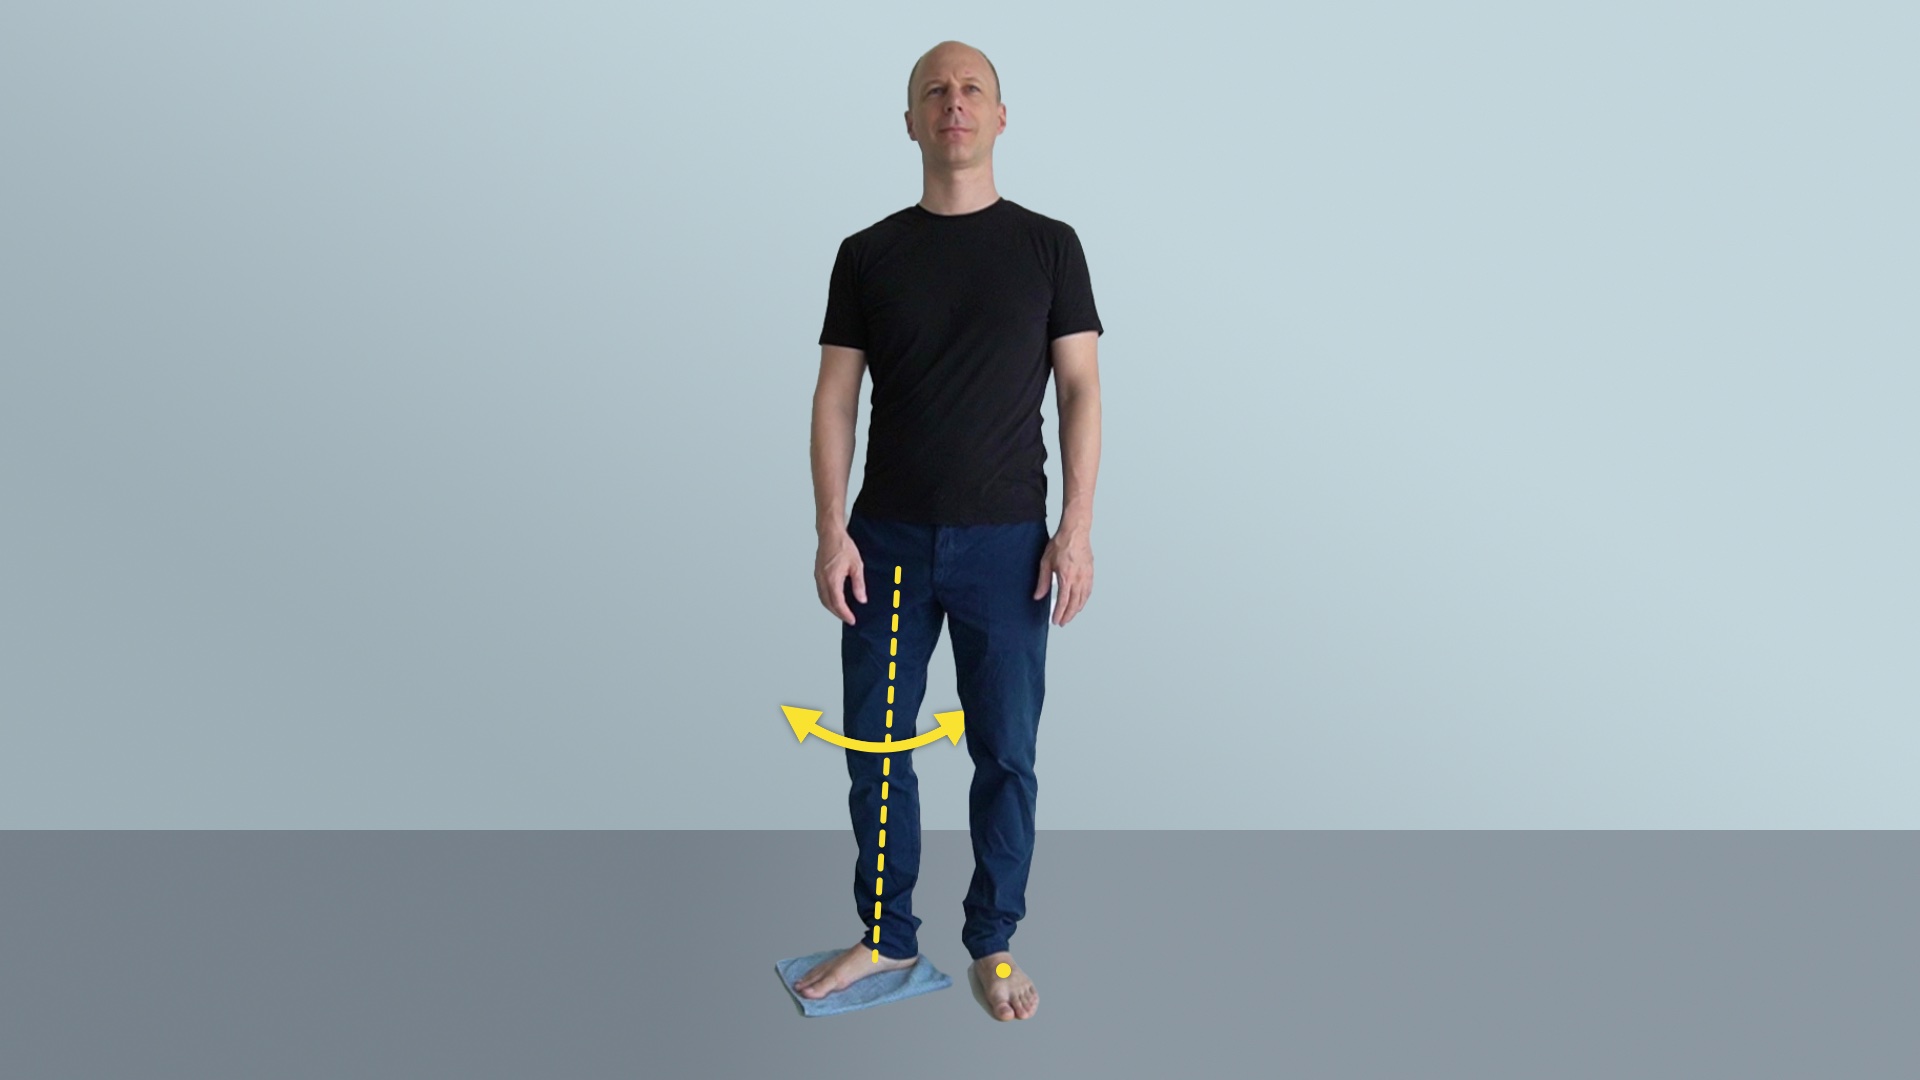
Turn right leg
On turning your right leg its toes point more to the right, then more forwards and then to the left.
- Stand on a sliding surface with your right foot, something like a towel or sock. Stand on a safe and non-slippery surface with your left foot. Hold on to a chair or wall for safety.
Keep your right leg straight, stand on it properly while turning it along its circumference.
Turn right leg
On turning your right leg its toes point more to the right, then more forwards and then to the left.
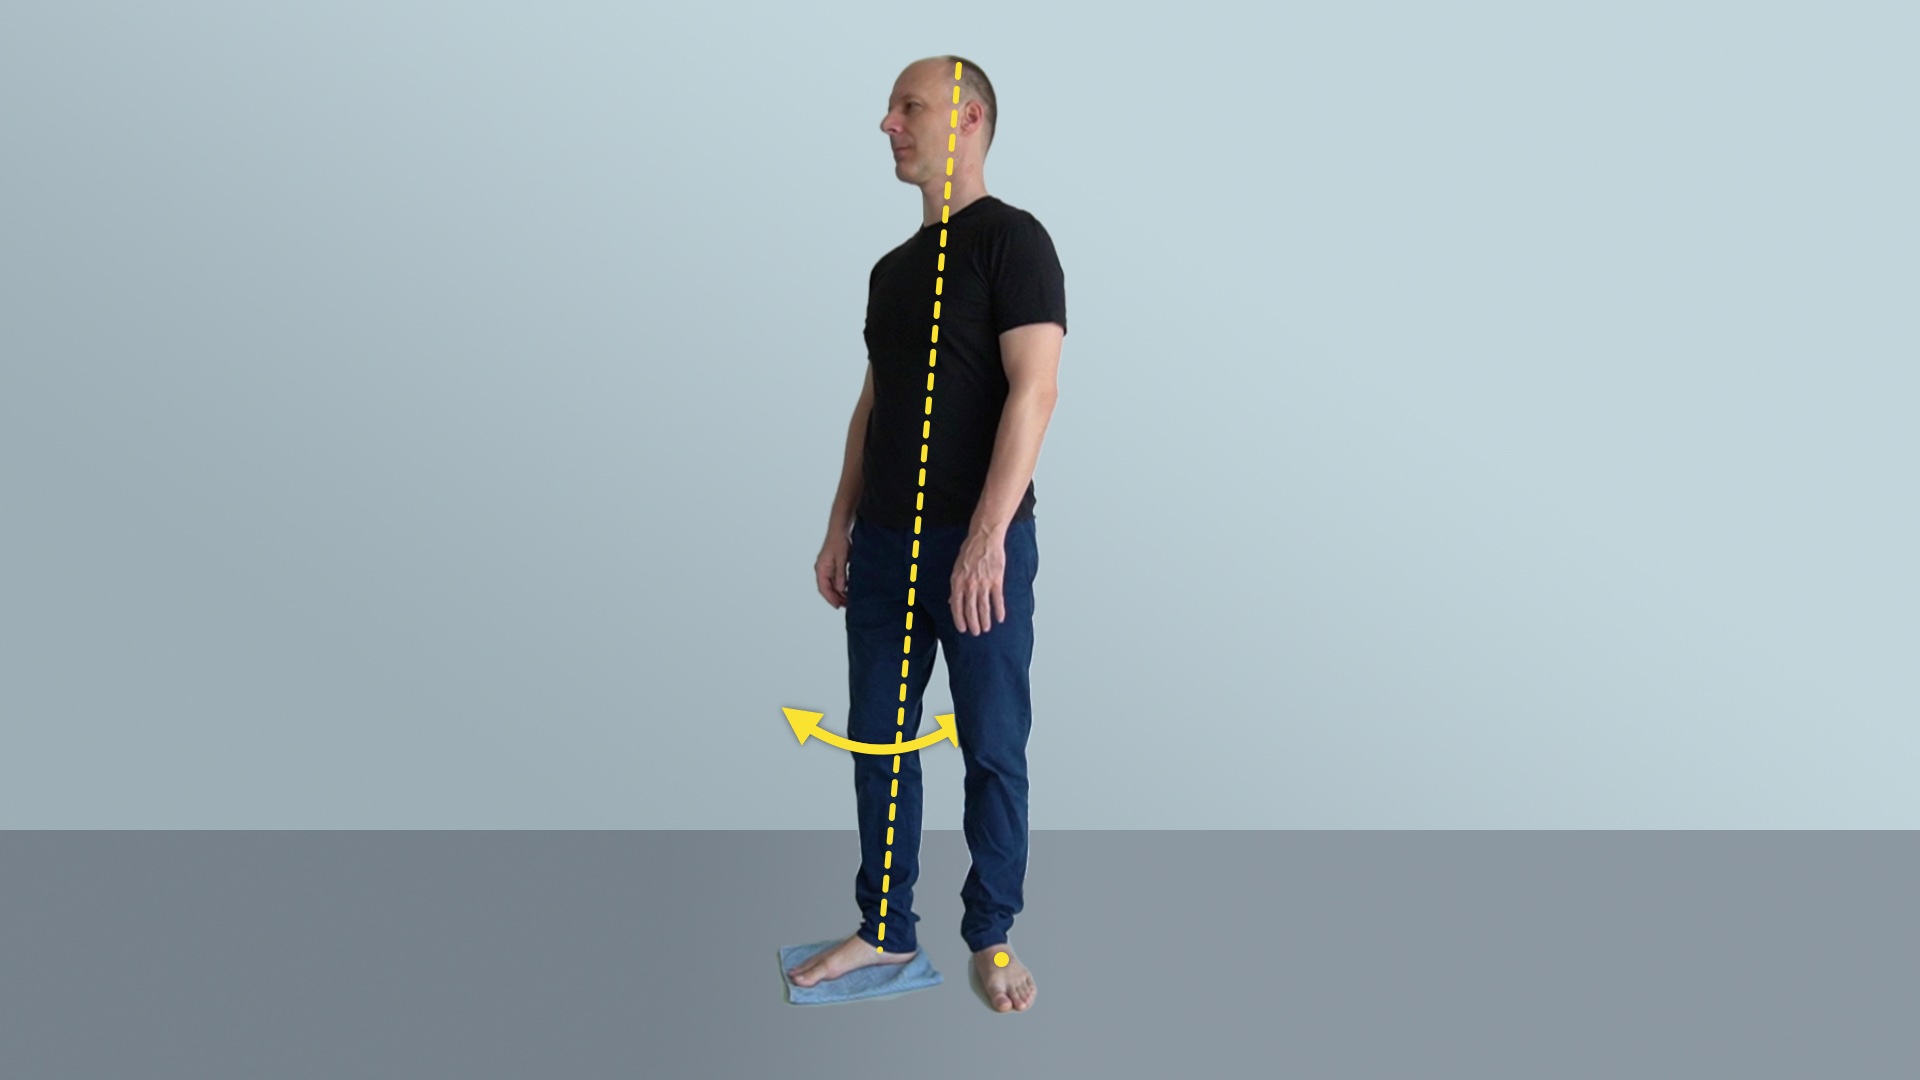
Stand upright, with your weight shifted a bit more onto your left leg
Turn right leg together with torso
Turn your pelvis, shoulders and head together with your right leg.
- Let your nose always be facing in the same direction as your toes.
Shift your weight a bit more onto your left leg, so that the right leg is free to turn.
Turn right leg together with torso
Turn your pelvis, shoulders and head together with your right leg.
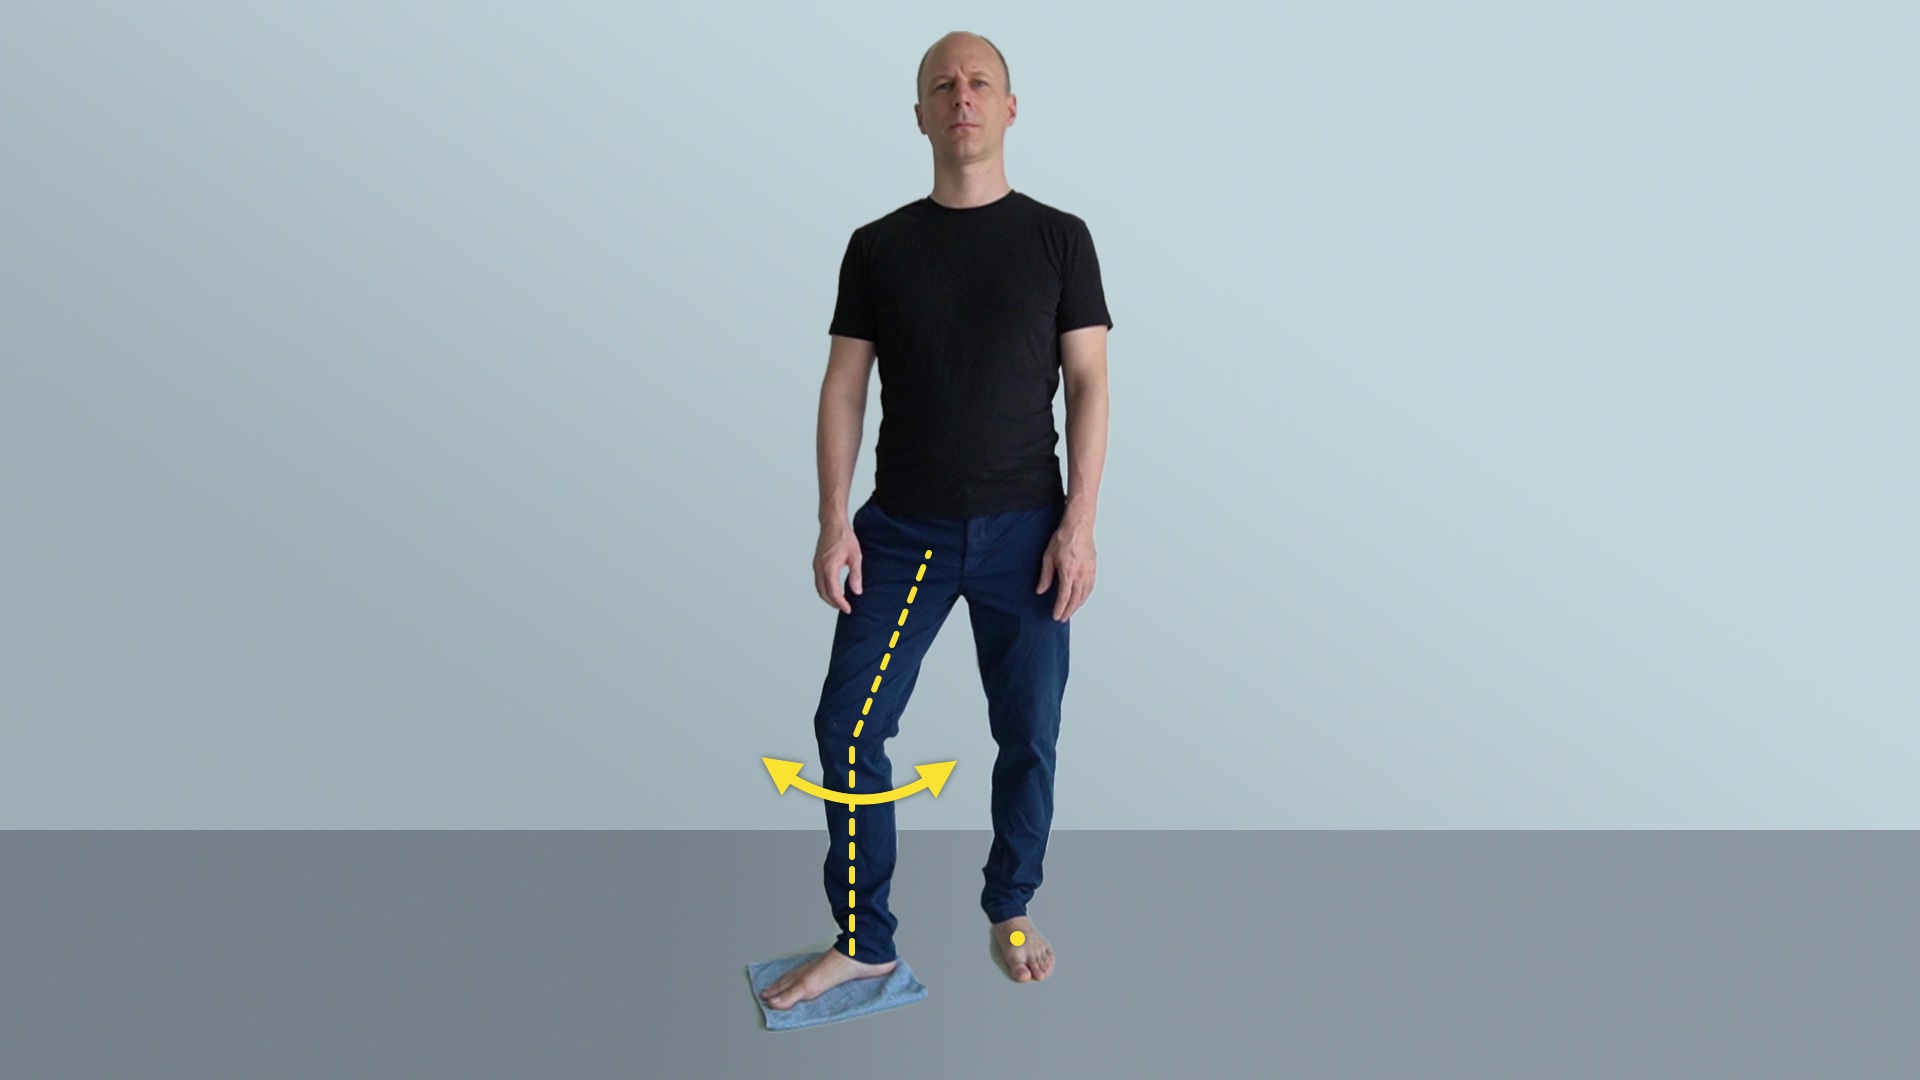
Stand upright with right knee a bit placed forwards and out to the right side
Turn right leg, knee slightly bent
Place your foot more to the right and forwards. Like this try the previous two movement variations again.
- Also try this: bend your left leg a little bit, like in dancing. When both knees are bent the pelvis is more free to turn.
Your lower leg has two bones, the tibia and fibula. They make it possible to rotate the lower leg and move the forefoot left and right when the knee is bent.
Turn right leg, knee slightly bent
Place your foot more to the right and forwards. Like this try the previous two movement variations again.
Stand upright like in the first movement
Reference movement
Turn right leg, without the torso
Only turn your right leg. Keep your pelvis, shoulder girdle and head oriented forwards.
- Now the movement might feel more clearly driven and easier to identify than in the first try in the beginning.
Reference movement
Turn right leg, without the torso
Only turn your right leg. Keep your pelvis, shoulder girdle and head oriented forwards.
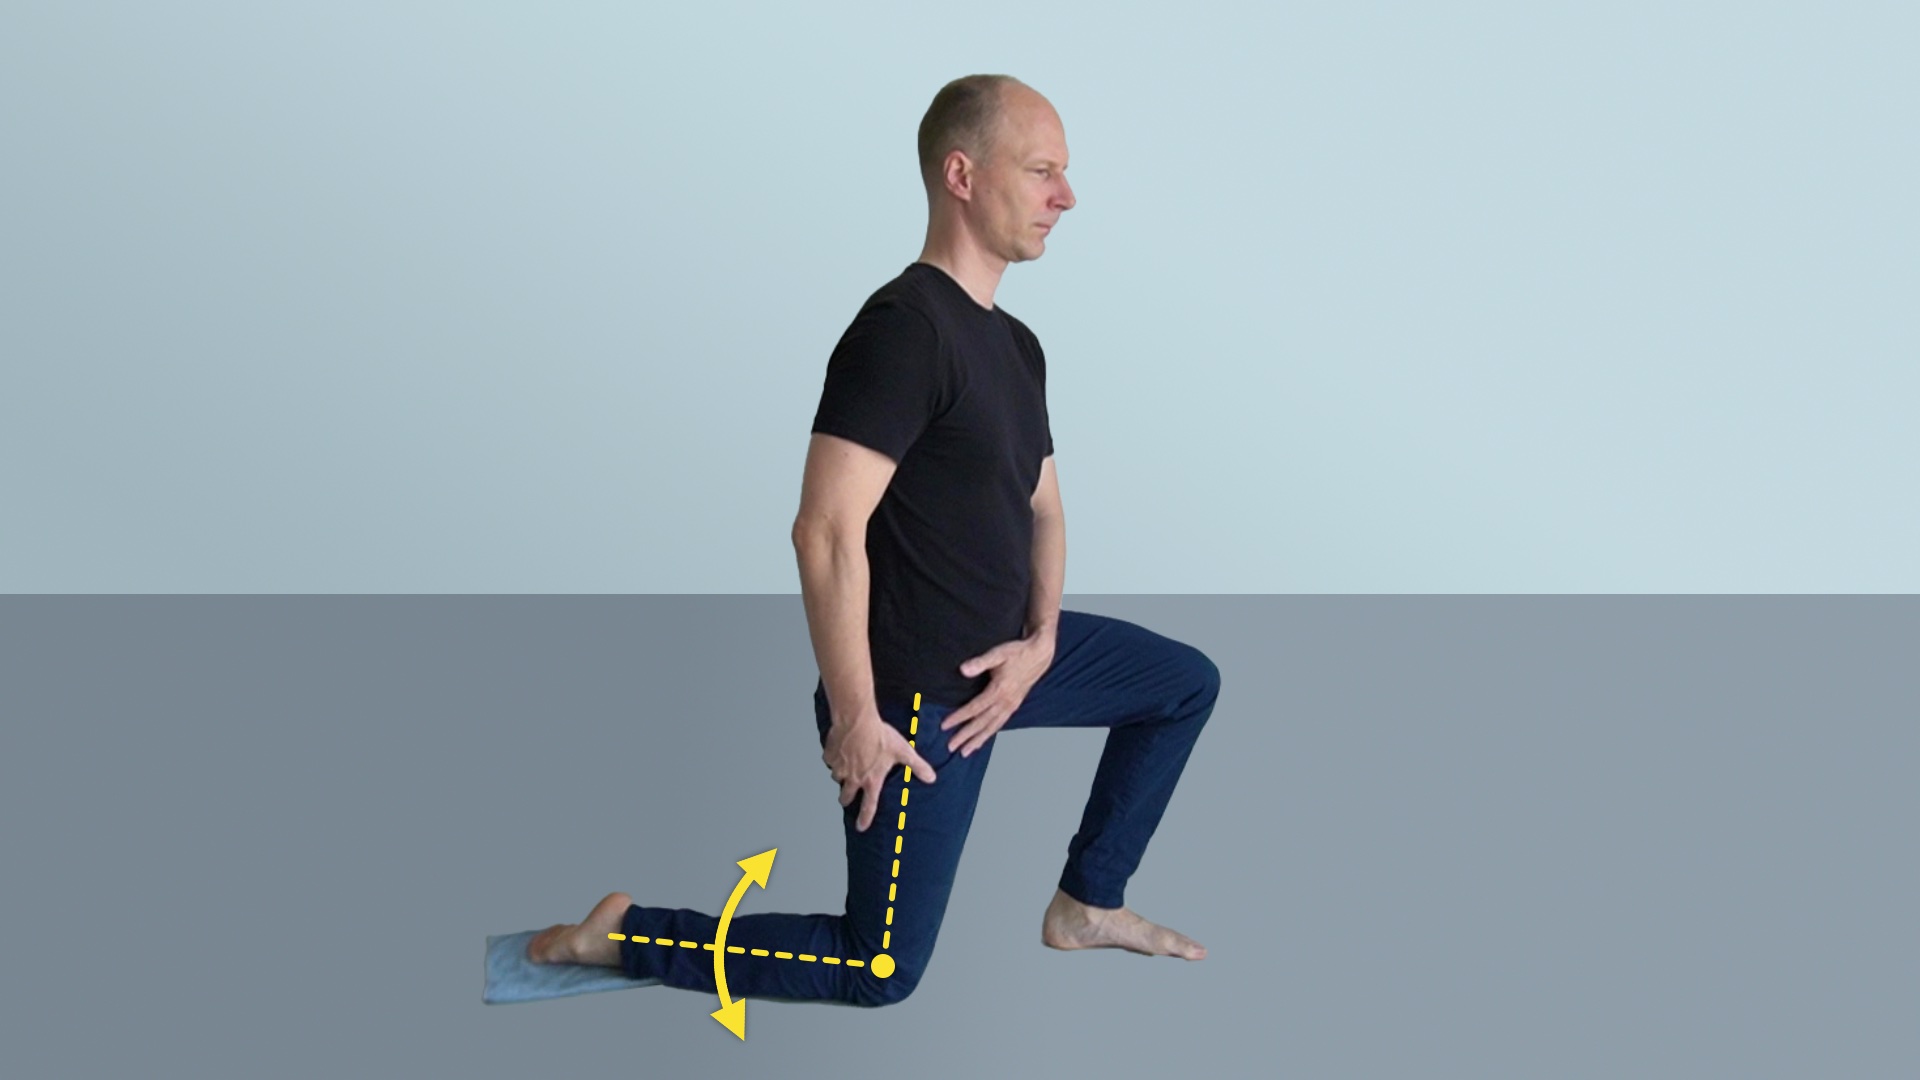
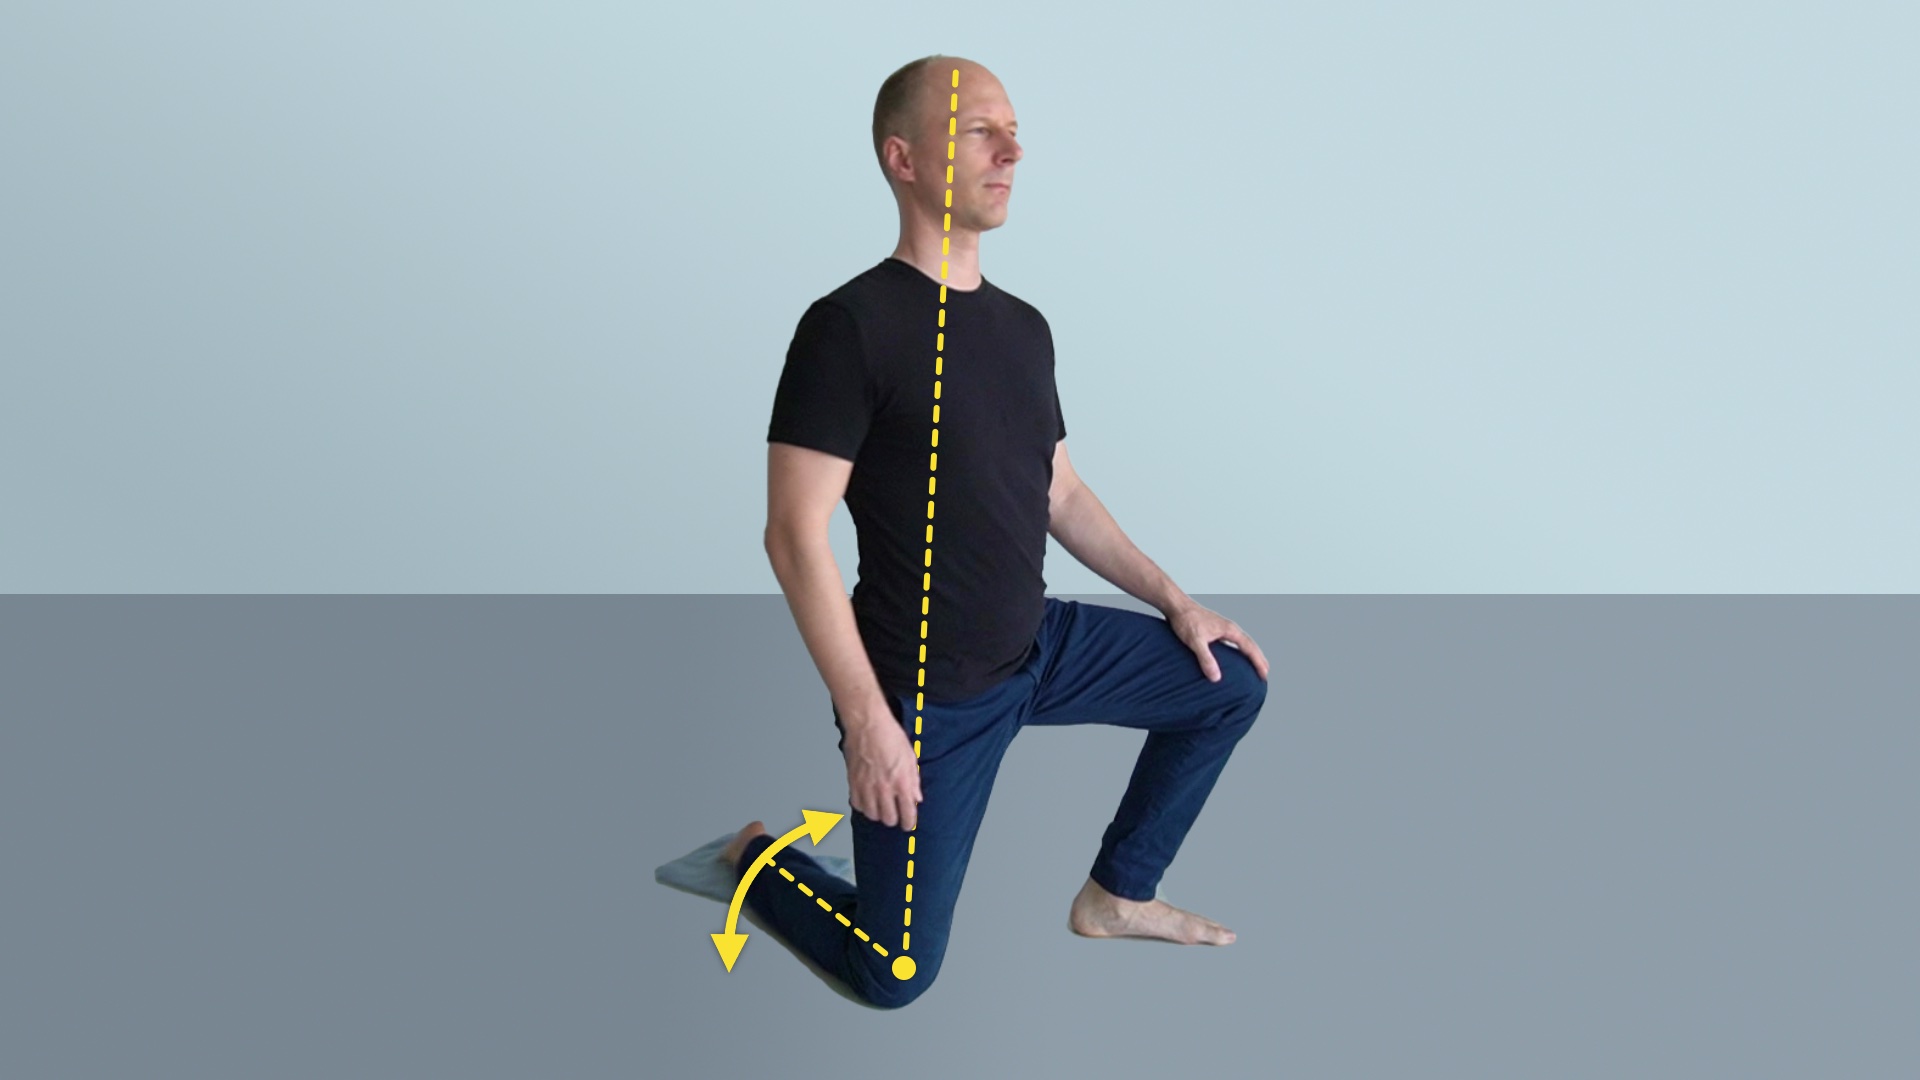
Kneel, with your left knee on the ground, the right foot standing.
Turn right foot
Turn right foot left and right. Keep your right heel in place. Don't move your right knee.
- Only slide your right fore-foot left and right, hold the rest of yourself motionless.
This is a rotation of the right lower leg. The fibula head must move.
Turn right foot
Turn right foot left and right. Keep your right heel in place. Don't move your right knee.
Kneel like before. Have your right fore-foot pointing forwards in the same direction as your right thigh.
Tilt right knee left and right
Keep your foot in place. Tilt your right knee left and right. Make it a small movement.
- Don't strain, don't push your knee forcefully right and left. Only do what's easy and comfortably possible.
When you do it slowly and softly enough, you will notice that your entire right foot may start to be free, and twist and tilt over its edges.
Tilt right knee left and right
Keep your foot in place. Tilt your right knee left and right. Make it a small movement.
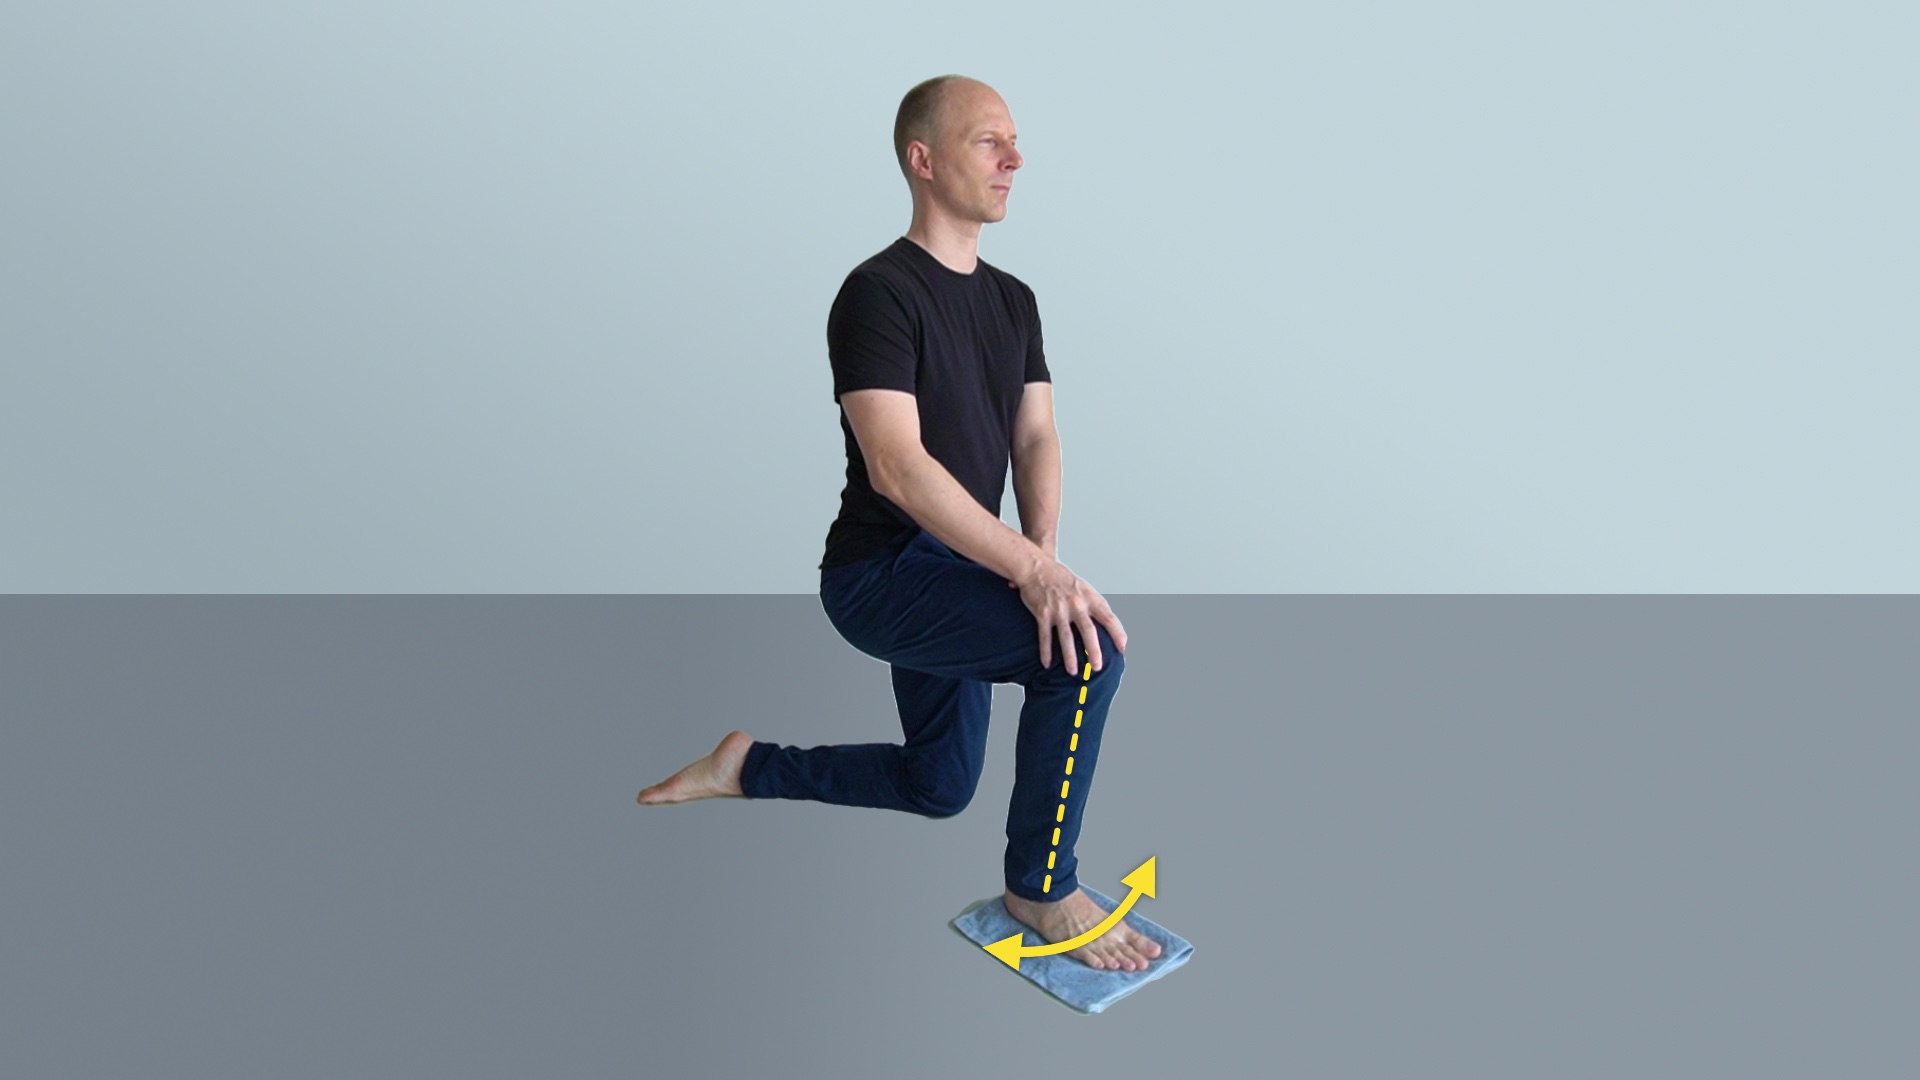
Change over the legs, kneel on your right knee, with the toes and instep of your right foot flat on the floor, have your left foot standing.
Slide right foot right and left
Keep your right knee in place, allow your right upper leg to rotate in your hip joint.
- Keep facing forwards, don't turn your pelvis.
Slide right foot right and left
Keep your right knee in place, allow your right upper leg to rotate in your hip joint.
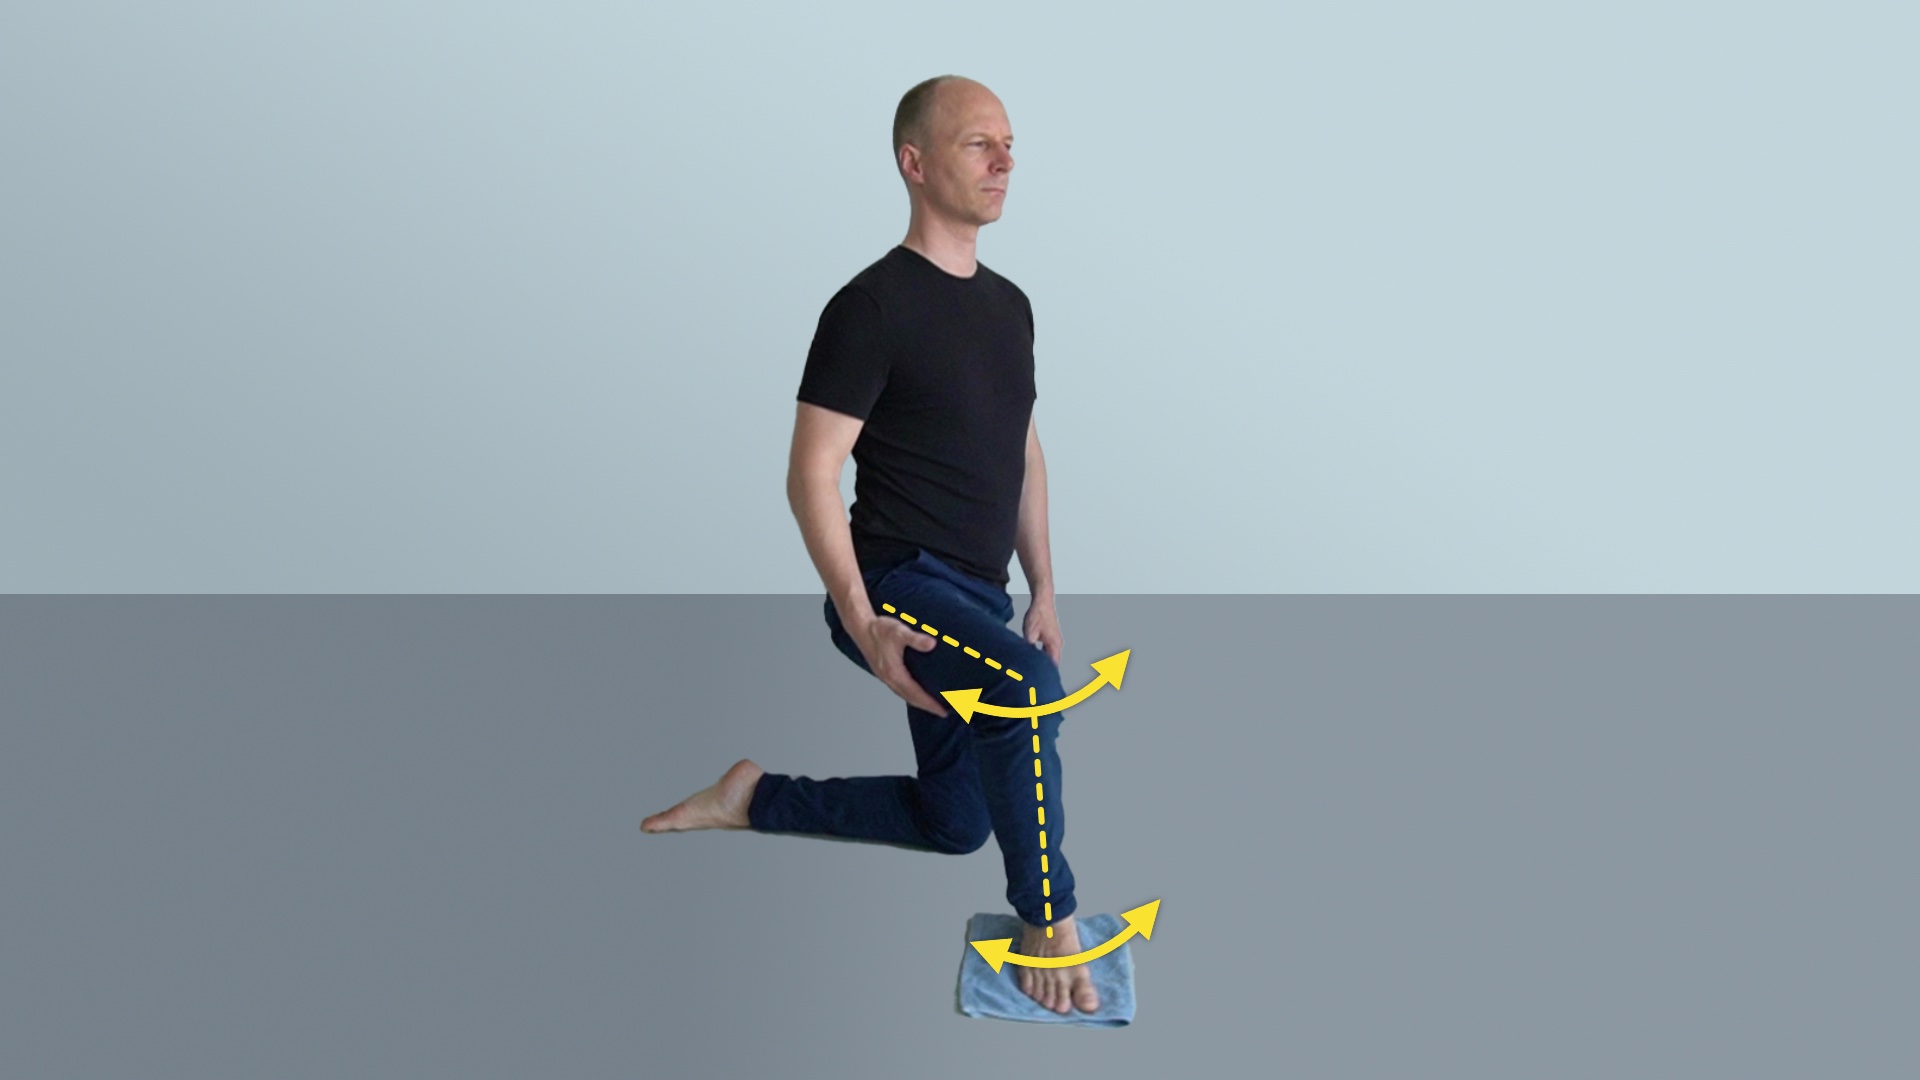
Kneel on your right knee like before
Slide right foot, together with torso
Turn your pelvis, shoulder girdle and head together with your right upper leg, as you slide your right foot left and right.
- Keep your right knee and left foot standing where they are.
Move your left knee forwards and backwards to turn your pelvis.
Sliding the right foot to the left is an outwards rotation of the right upper leg. Thus also turn your pelvis to the right, and vice versa.
Slide right foot, together with torso
Turn your pelvis, shoulder girdle and head together with your right upper leg, as you slide your right foot left and right.
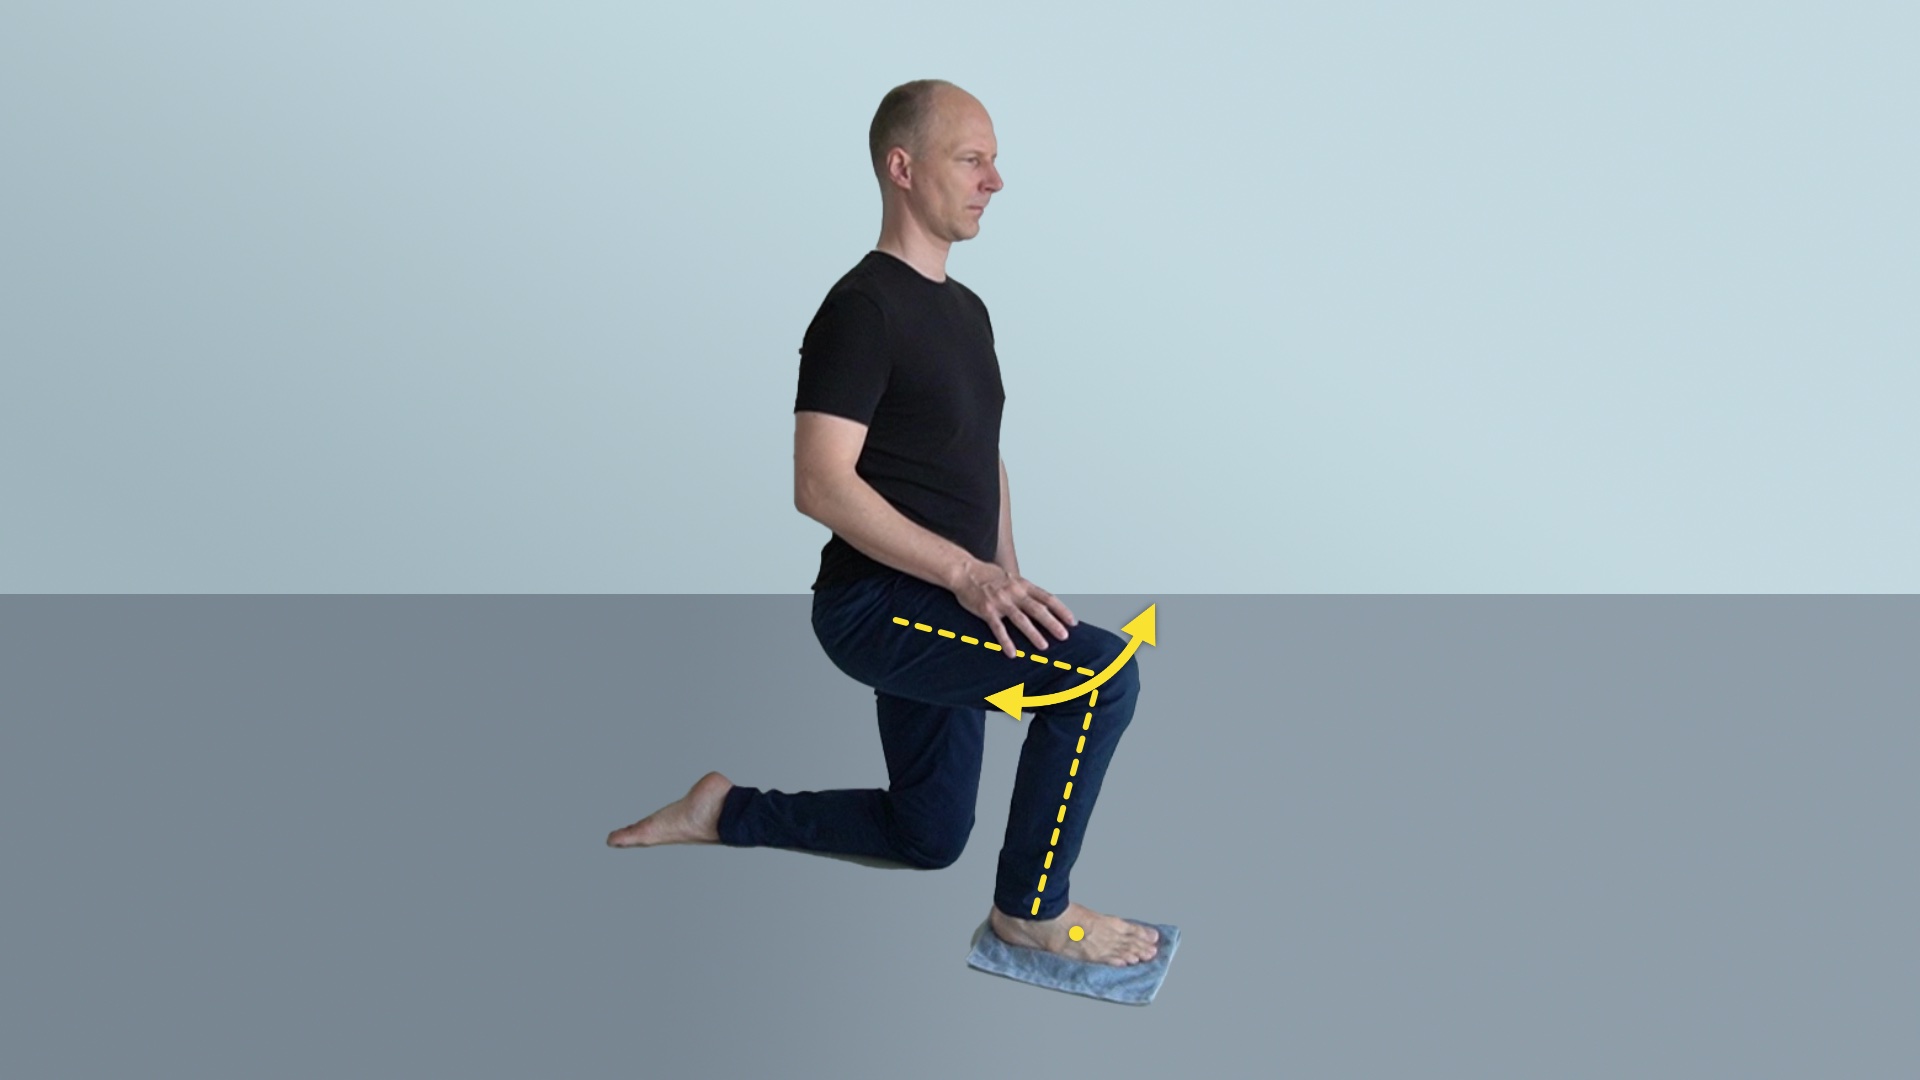
Kneel like before: on your right knee, have left foot standing.
Reference movement
Slide right foot right and left
It's the same movement like before, but feels different and very much improved. How is it now?
- Notice how much more freedom there is in your leg.
Reference movement
Slide right foot right and left
It's the same movement like before, but feels different and very much improved. How is it now?
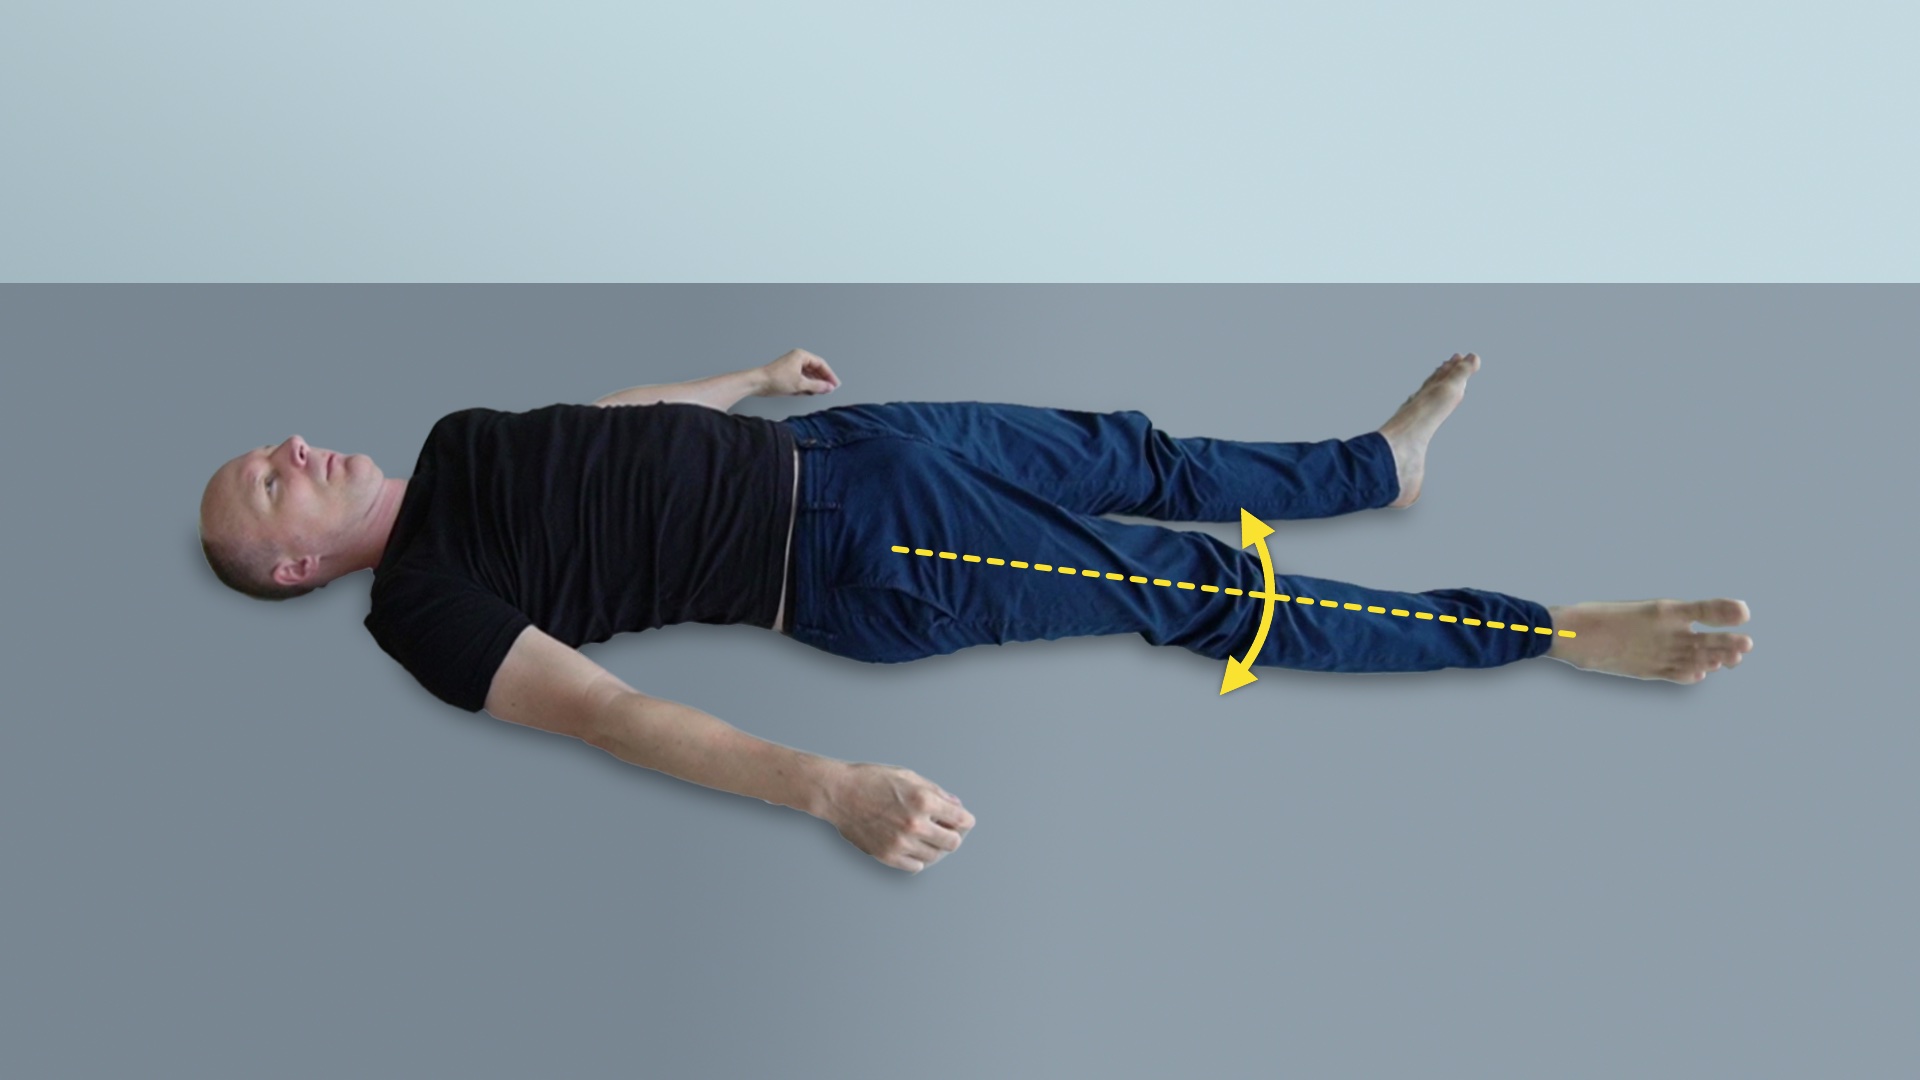
On your back, left foot standing, left knee bent towards the ceiling, right leg extended
Turn right leg
Move your right leg only. Once the toes are pointing more outwards, then more inwards.
- Move slowly, or move fast.
Make small movements, or big movements
Experiment with varying speed and distance.
Turn right leg
Move your right leg only. Once the toes are pointing more outwards, then more inwards.
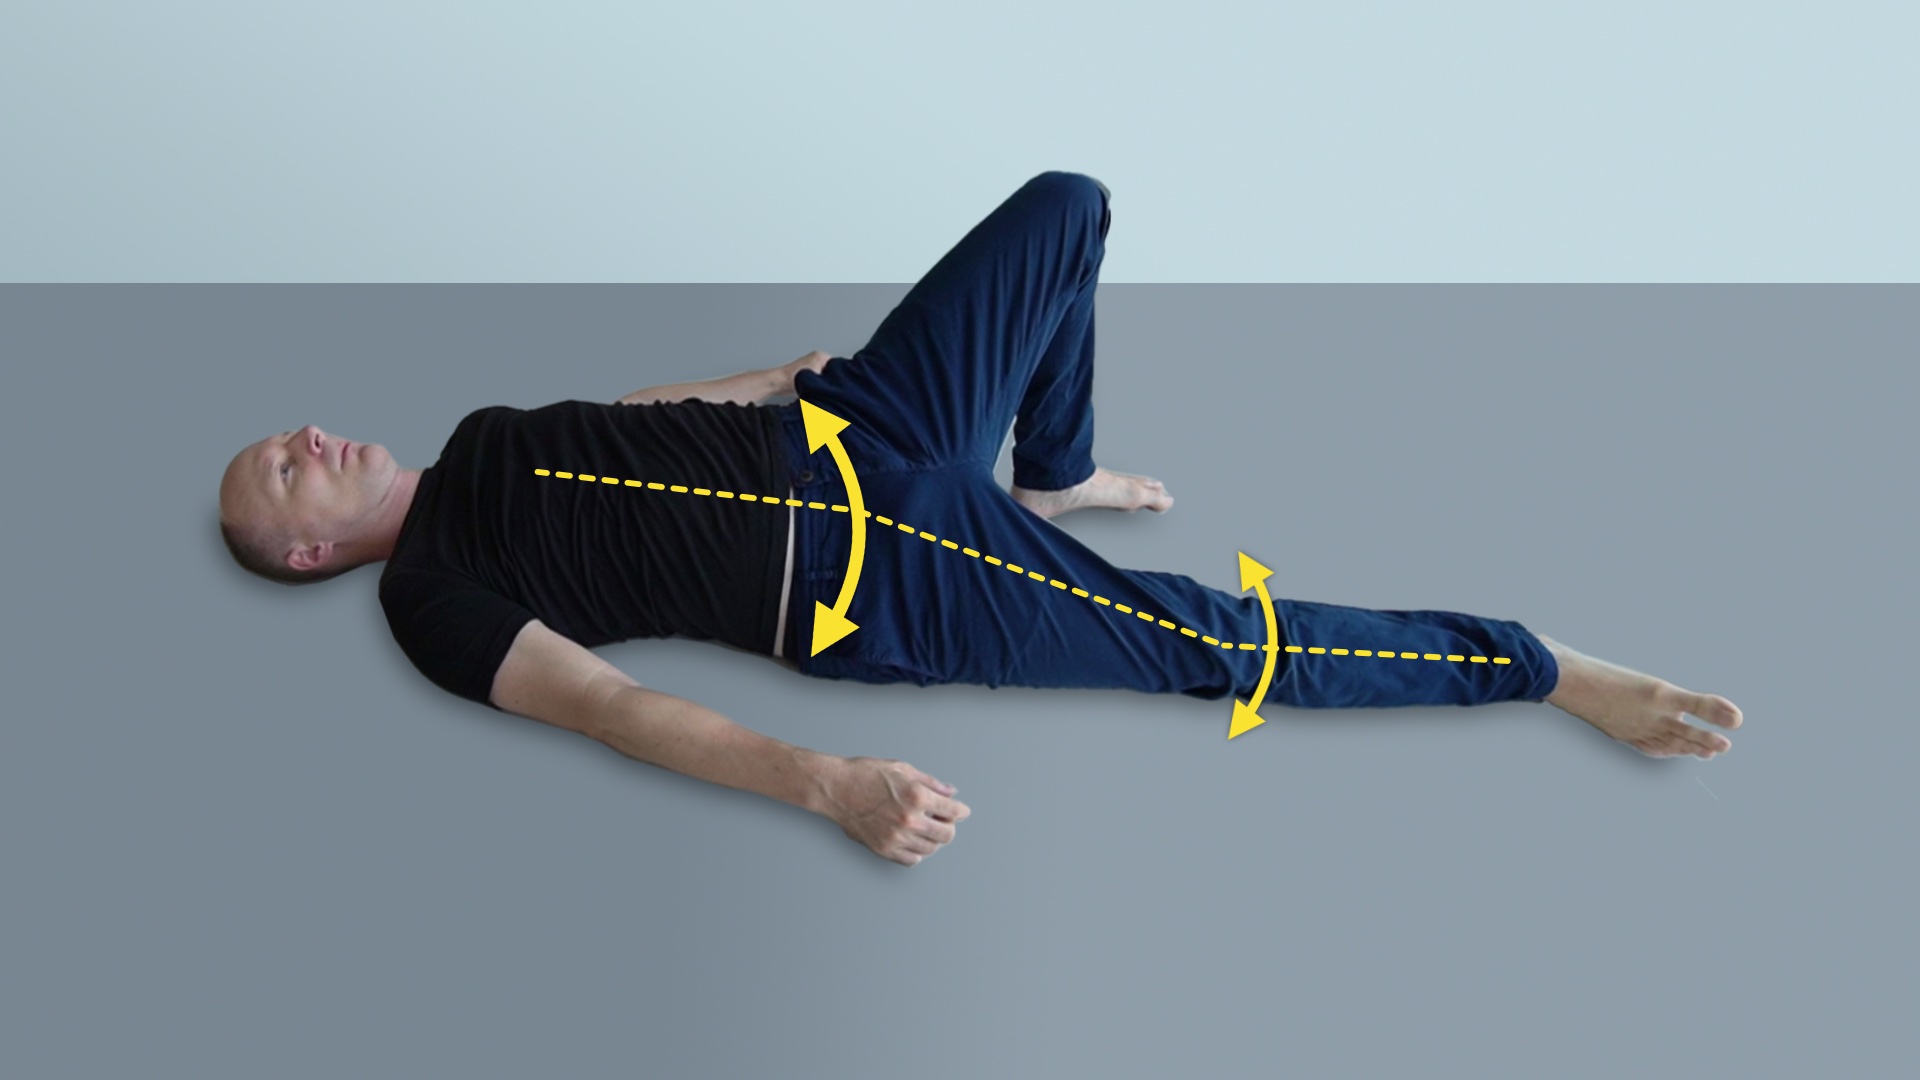
On your back, left foot standing, left knee bent towards the ceiling, right leg extended
Turn right leg, together with pelvis
Push with your left foot against the floor, roll your pelvis to the right, roll your right leg to the right.
- Your pelvis rolls together with your right leg.
Observe how this movement travels up your torso to your head. Allow your head to roll to the right as well.
You might help with your left elbow or hand to push against the floor too.
Turn right leg, together with pelvis
Push with your left foot against the floor, roll your pelvis to the right, roll your right leg to the right.
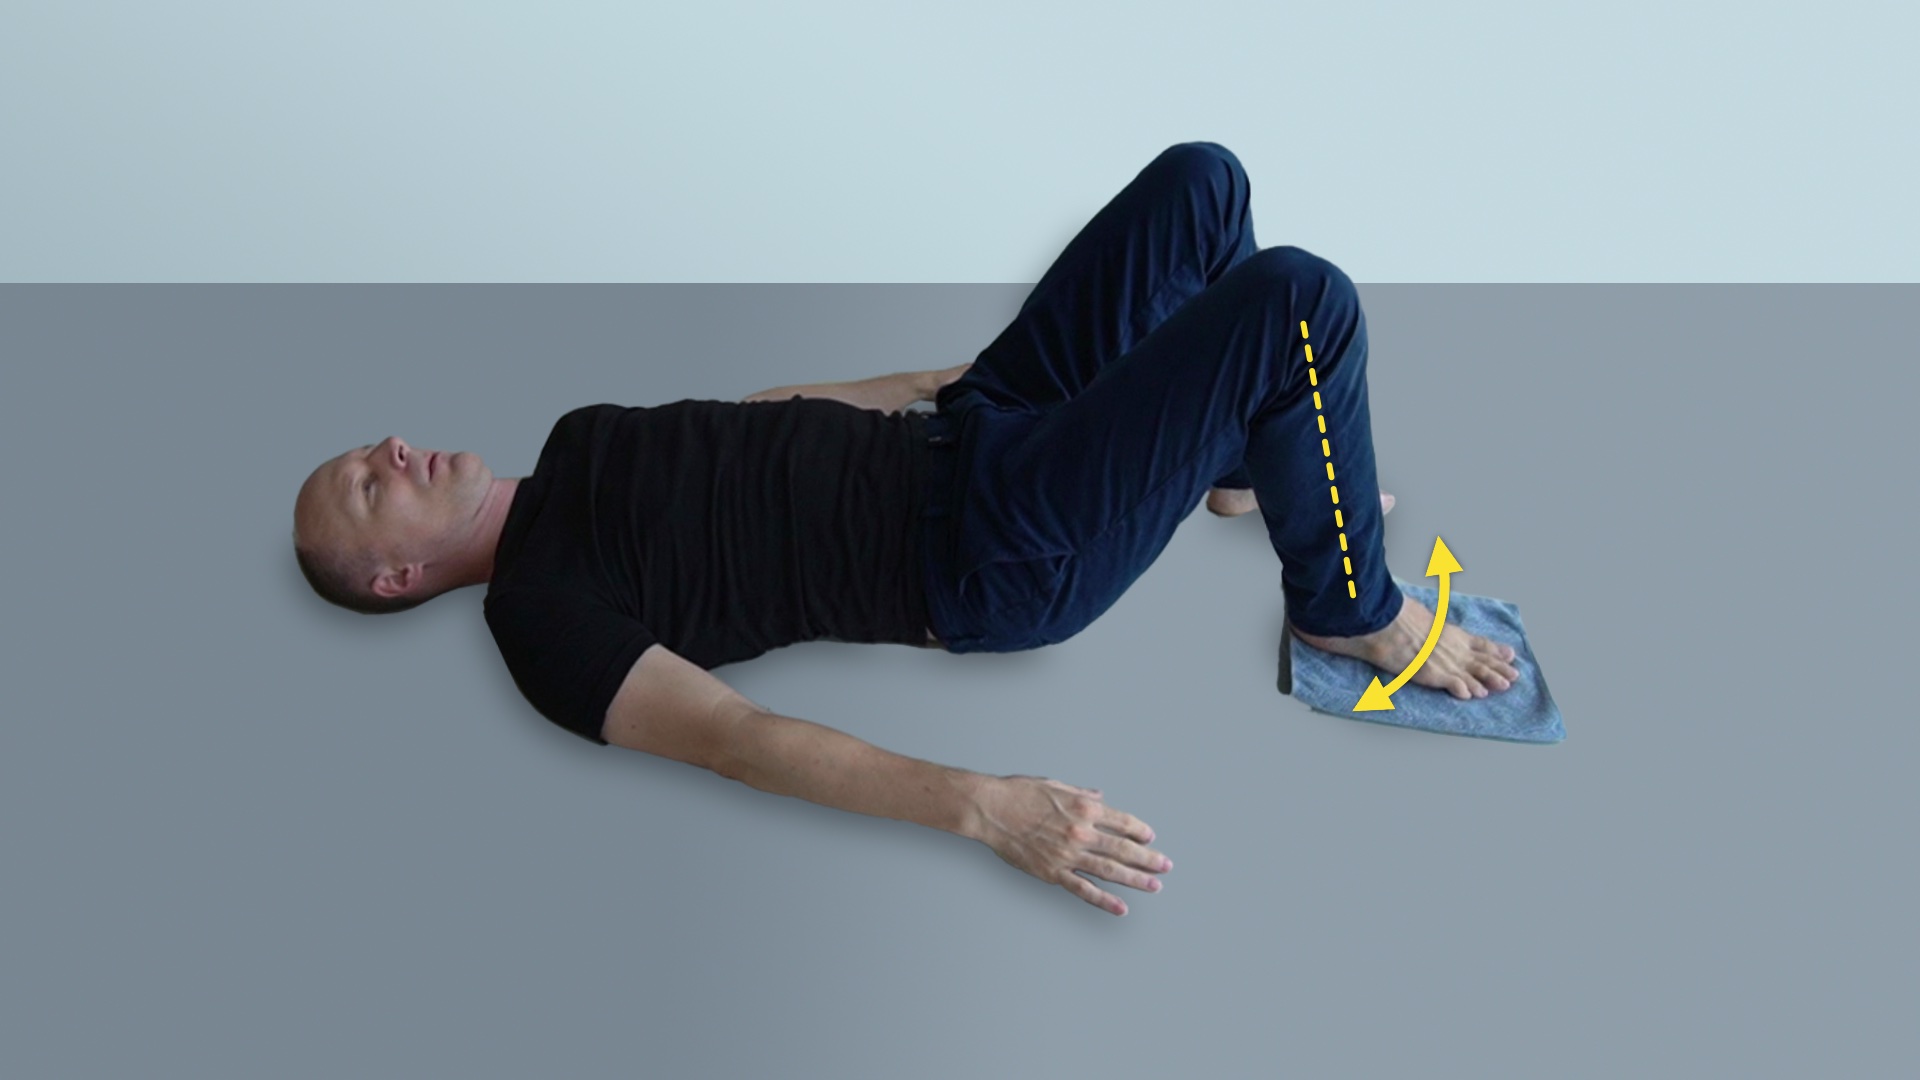
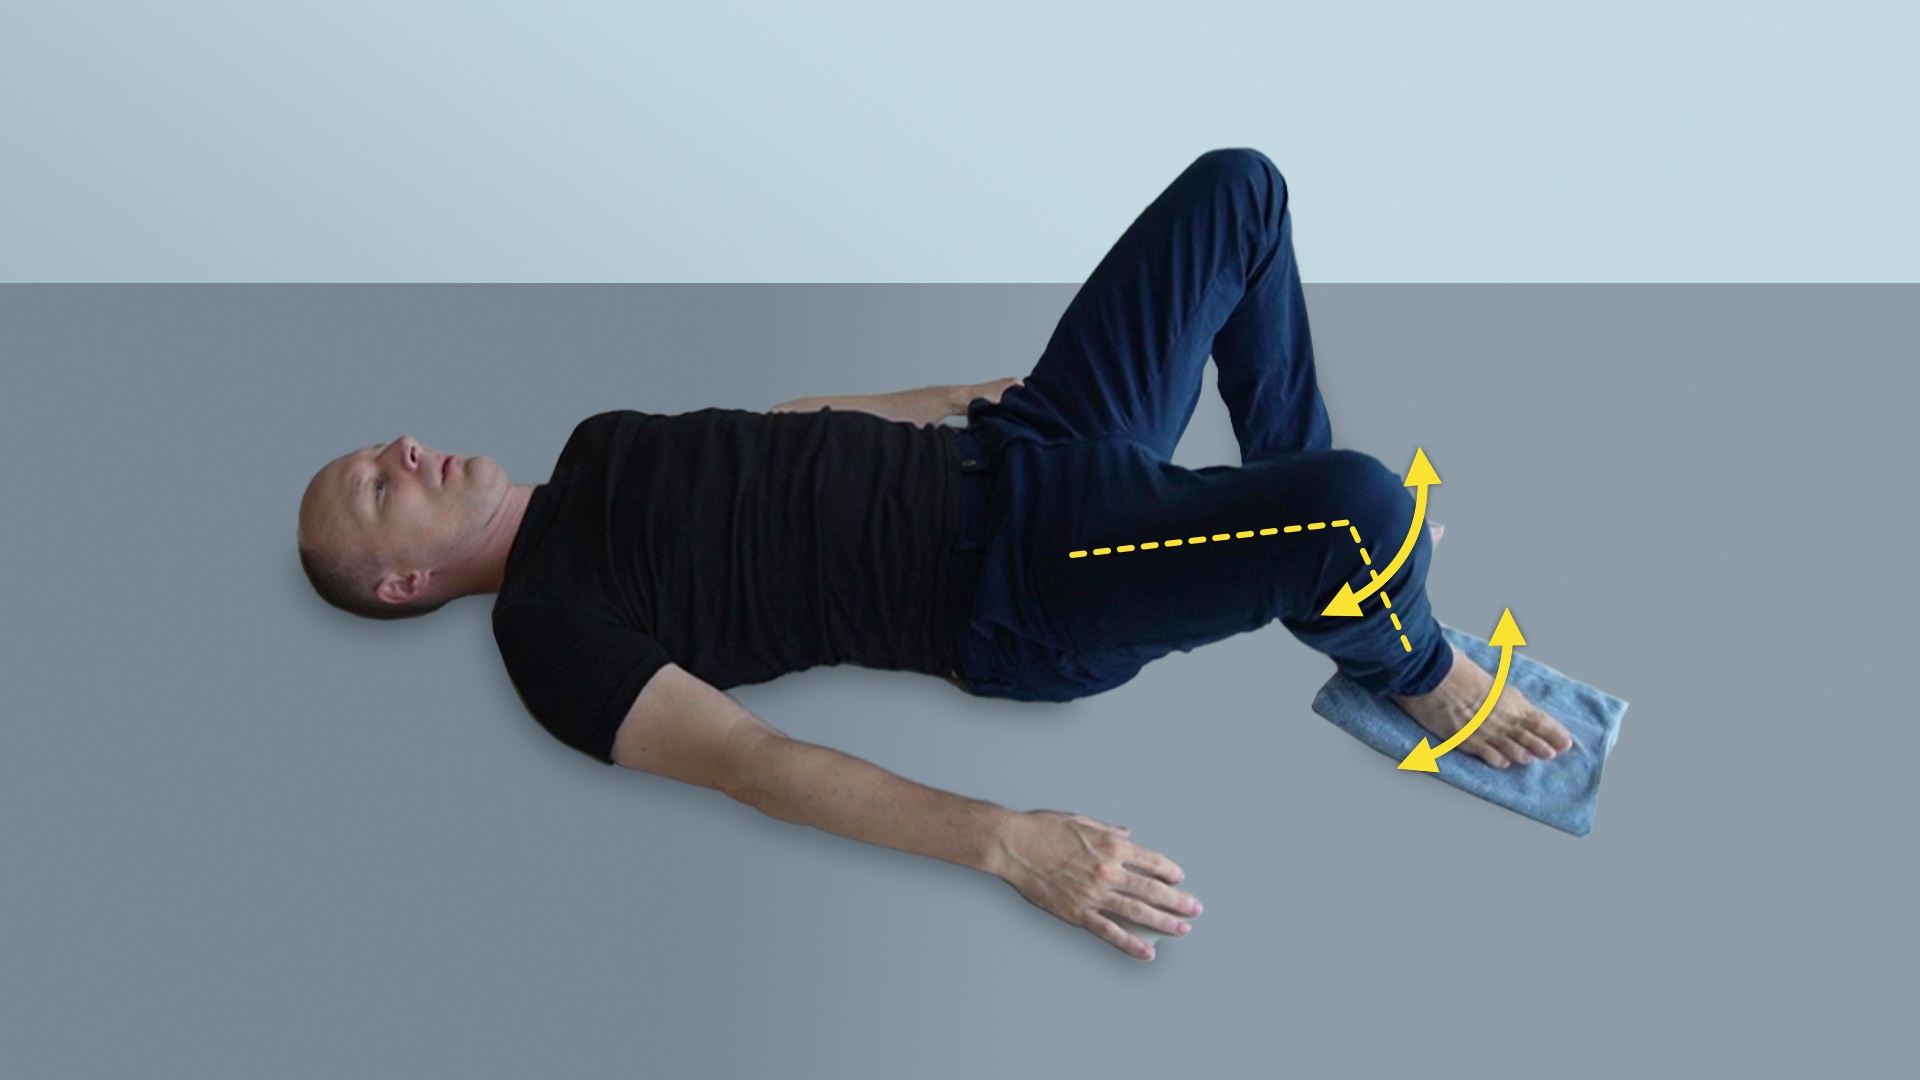
On your back, both foot standing, both knees bent towards the ceiling
Turn right foot left and right
Keep your right knee still. Use your right heel as the turning point. Wipe right and left with your right fore-foot.
- Do not lift the toes of your right foot. At all times keep your toes on the floor.
Do not move your right knee, keep it still in place.
Turn right foot left and right
Keep your right knee still. Use your right heel as the turning point. Wipe right and left with your right fore-foot.
On your back, both foot standing, both knees bent towards the ceiling
Turn right foot, together with knee
Continue turning your right right foot on the floor, but move your right knee together with your foot.
- Don't hold your breath, don't tighten your jaw.
Turn right foot, together with knee
Continue turning your right right foot on the floor, but move your right knee together with your foot.
Stand upright, right leg straight or bent
Reference movement
Turn right leg
Compare to the beginning of the lesson: in which ways has it changed to before?
- Turn your right leg inwards and outwards alongside it's axis.
The more you bend your knee the more freely your lower leg can turn in relation to your upper leg.
The more you straighten your knee the more the turn gets locked in.
Reference movement
Turn right leg
Compare to the beginning of the lesson: in which ways has it changed to before?